 |
 |
| Pontiac GTO & Holden/Vauxhall Monaro Rally Stripe Installation Notes | |
|
|
|
| Pontiac GTO & Holden/Vauxhall Monaro Rally Stripe Installation Notes | |
| While our precut kits appear to be "simple" to install, application techniques used in certain areas of the kit prove to make the project go smoother. Please review the notes below that we've compiled to assist in the installation. |
| By all means, if you do not feel comfortable with the thought of installing the stripes yourself, we suggest contacting a local graphics installer and/or automotive body shop in your area to assist. |
| In the event a new piece is required, simply let us know the part number (ATD-PNTGTOGRPH3) proceeded by the letter designation of the piece required (i.e., ATD-PNTGTOGRPH3h). We'll provide a cost for the piece and make arrangements to send one out upon receipt of payment. |
|
|
|
|||||
| Prior to installing the Hood stripes, carefully remove the Washer Nozzles for easier installation. | ||||||
| When squeegeeing towards the front of the hood on stripes A & B, the graphic may want to wrinkle. This is due to the convex, egg shape, surface of the hood. Tension, by means of pulling the stripe, and firm pressure with your squeegee will assist in setting the graphic in these areas. | ||||||
| When the installation is complete, simply cut an "X" in the Washer Nozzle holes located in the hood and re-install the Nozzles through the vinyl. | ||||||
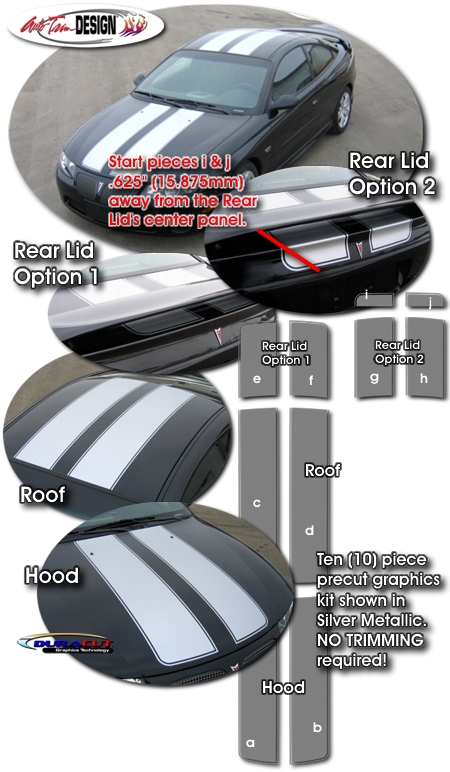
| 5) This stripe kit is uniquely provided with two (2) Rear Lid options. For a simple installation with the stripe merely on the top of the Rear Lid, install pieces E & F. If you desire a portion of the graphic to be visible from the rear, install pieces G, H, I & J instead. | ||||||
| Due to the nature of the compound curve at the edge of the Rear Lid, it is very difficult to install the stripe kit in one piece. Thus, using the pieces shown for Rear Lid Option 2, a small overlapping splice will allow the stripe to flow over the rear. | ||||||
| Starting at a distance of .625" (15.875mm) from the Rear Lid's center panel, install pieces I & J. Set the bottom of the pieces and work up into the concave area. Once these pieces are installed, continue with the installation of pieces G & H. We suggest lining up theses pieces with I & J and installing them from the rear edge to the front of the Lid. Slight trimming may be required at the splice. While the adhesive is not set, you may wish to carefully lift the outer pinstripe slightly in an effort to align it with the lower pinstripe. | ||||||
| In the event a new piece is required, don't fret. While it's frustrating that a little piece of vinyl can give us so much grief, just remember that the worst case scenario is the you just have to purchase another one - it's certainly not the end of the world. We suggest swearing a bit and moving on. | ||||||
|
|
||||||
|
Product Part Lists |
|
'Click' on the part numbers below to view the pieces within the kit |
| Pontiac GTO - Holden/Vauxhall Monaro Rally Stripes 1 - Hood w/o Vents - ATD-PNTGTOGRPH3 |
| Pontiac GTO - Holden/Vauxhall Monaro Rally Stripes 1 - Hood with Vents - ATD-PNTGTOGRPH4 |
| Optional two (2) piece Factory Spoiler graphics kit (ATD-PNTGTOGRPH9) is available for $19.95. |
| As always, if you have any questions feel free to e-mail us. We're here to serve. Thanks! |
| Need to contact us? Simply email us at customerservice@autotrimdesign.com. |
| Copyright © 2012 [Auto Trim DESIGN®]. All rights reserved. |
| Trademark Notice |
| All service marks and/or trademarks used herein are the property of the respective trademark holders; they are not used here for advertising or commercial purposes. Their use is done on a Fair Use assumption and without intent to compete with or take advantage of the trademark holder. |
|
Auto Trim DESIGN® is in no way affiliated with, sponsored by or authorized by the associated trademark holder, unless otherwise specified. Any reference related to marks is made solely for identification purposes and is not intended to create any confusion or deception in the marketplace. |