|
| Headlight "Eyelid" Decal Installation Instructions |
|
|
| Headlight "Eyelid" Decal Installation Instructions |
| Our Headlight "Eyelid" decals are a simple way to dress up the front end look of your ride. With the comprehensive instructions that we provide as well as the installation photos below, you'll see that just about anyone can install this product with ease. |
|
|
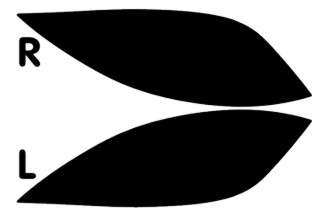
The Eyelid decal set will be marked with an "R" and an "L" as shown in this sample image. "R" stands for the Right side while "L" is for the Left side as one is sitting in the vehicle looking forward. |
|
A note about Installation Conditions |
|
|
HEADLIGHTS AND DECALS MUST BE AT OR SLIGHTLY ABOVE ROOM TEMPERATURE FOR INSTALLATION. Suggestions to achieve proper temperature for installation in cold weather: Turn on headlights, place towel over headlights and wait until headlight is warm to the touch. The key to maximum adhesion is that both headlight and decals are at or slightly above room temperature (60-90 degrees F). USE CAUTION NOT TO OVERHEAT SURFACE OR DECAL MATERIAL. |
|
|
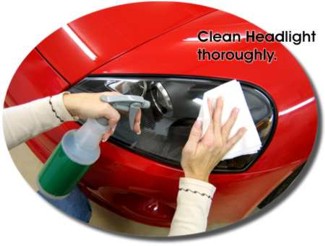
First, using a clean, lint-free wipe (i.e. untreated paper towel), clean ENTIRE surface of the headlight with an adhesive remover to remove waxes, silicones, etc., from surface. Second, clean headlight surface again with glass cleaner (avoid cleaners containing ammonia and/or soaps). Cleaning with our Rapid Prep Pre-Cleaner will suffice for both previous steps. Rubbing surface with fingers should yield a "squeaky clean" feeling & sound. Clean well around the aiming guides and the extreme edges of headlamp surface. |
|
|
A note about Headlight Cleanliness |
|
|
The prior use of synthetic protectants and silicones (i.e. Armorall, Son of a Gun, Rainex, etc.) on the substrate can result in adhesive difficulties. Therefore, special substrate cleaning with a silicone removal agent (i.e. 3M #08984 General Purpose Adhesive Cleaner, Denatured Alcohol, etc.) may be required, perhaps repeatedly. A final cleaning with DENATURED ALCOHOL is recommended with thorough drying of surface. Clean surface until all slick feel on the substrate is gone. Always test any cleaner on an inconspicuous area first for any reactions to surface finishes. |
|
|
|
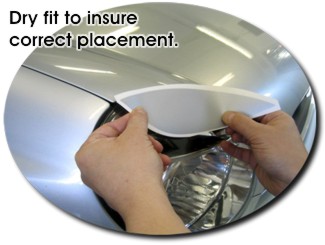
Pre-fitting is suggested. As shown above, you'll be receiving the Eyelid decal set on a sheet. Carefully trim backing sheet around each decal with a scissors or utility knife (be careful not to cut into the decal). Once trimmed, "dry fit" the decal to get an idea of how it is to be installed. |
|
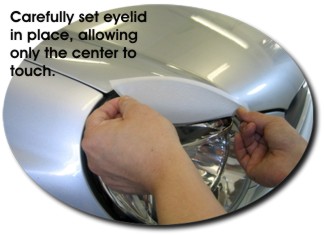
Once you've pre-fit the decal, remove the backing paper and carefully set the decal in the best possible position, allowing only the center of the decal to touch the headlight surface. If you need to reset the decal, simply give the decal a quick "snap" up to release it from the headlight surface. |
 |
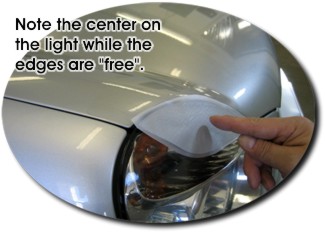 |
Once the decal is set in the correct position onto the center of the decal, the edges should be "free" as shown in the image. |
|
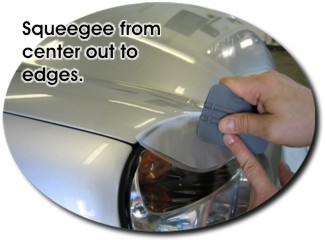
With firm pressure, squeegee from the center the decal out to the edges. |
 |
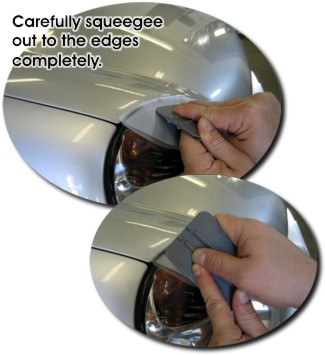 |
As you squeegee close to the edges, press harder with the squeegee to the edges, thereby forcing the decal to lay flat. |
|
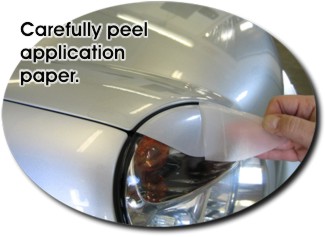
After the entire decal is installed, carefully peel the application paper back. If bubbles are evident, simply puncture the vinyl with a pin and force the air our with your finger. |
 |
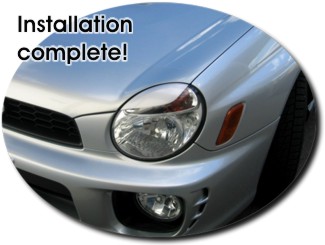 |
Simple As That! |
| Please Note: Some colors of vinyl may be translucent when lights are on. If you desire a "solid" look with no light shining through, we recommend installing a set of "Eyelids" in Black as a base prior to the color you desire. | |
|
IMPORTANT NOTICE TO PURCHASER. |
|
| Eyelid decals are only recommended for Off-road or Show use only. As always, we suggest that you check your local/state laws and ordinances prior to purchase and application. | |
|
|
|
|
As always, if you have any questions feel free to e-mail us. We're here to serve. Thanks! |
| Need to contact us? Simply email us at technical@autotrimdesign.com. |
| Copyright © 2011 [Auto Trim DESIGN®]. All rights reserved. |
| Trademark Notice |
| All service marks and/or trademarks used herein are the property of the respective trademark holders; they are not used here for advertising or commercial purposes. Their use is done on a Fair Use assumption and without intent to compete with or take advantage of the trademark holder. |
|
Auto Trim DESIGN® is in no way affiliated with, sponsored by or authorized by the associated trademark holder, unless otherwise specified. Any reference related to marks is made solely for identification purposes and is not intended to create any confusion or deception in the marketplace. |