|
|
|
| The InvisiGARD® Headlight Protection System product is a simple way to provide protection to your vehicle's valuable headlights. With the comprehensive instructions that we provide as well as the installation photos below, you'll see that just about anyone can install this product with ease. | |
|
|
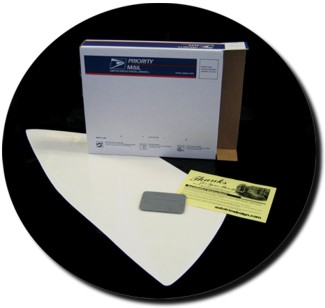
The kit ordered will include a squeegee, a sheet of InvisiGARD® precut pieces and information on how to view our detailed and comprehensive online instructions. |
|
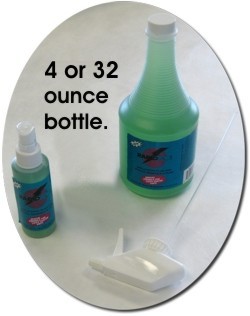
Installation supplies you'll need to gather include two (2) spray bottles, paper towels, denatured alcohol (or methyl hydrate), baby shampoo, scissors (or utility knife) and squeegee. We provide the squeegee with the kit. The reason we suggest baby shampoo is that it contains less detergents than other liquid soap products. |
|
|
|
***New*** As an alternative to denatured alcohol (or methyl hydrate) & baby shampoo, try Rapid Tac II! Available in various sizes, this environmentally friendly product can be used as a cleaner, Positioning Solution and Mounting Solution - All in One! Best of all Rapid Tac stimulates the adhesive to bond in approximately ninety seconds, even in adverse climates such as extreme hot or cold. It will not cause bubbles so there's no returning to poke holes in your work either. It's what we now use for our local installations!
|
|
A note about Installation Conditions |
|
|
HEADLIGHTS AND InvisiGARD® HEADLIGHT PROTECTORS MUST BE AT OR SLIGHTLY ABOVE ROOM TEMPERATURE FOR INSTALLATION. Suggestions to achieve proper temperature for installation in cold weather: Turn on headlights, place towel over headlights and wait until headlight is warm to the touch. The key to maximum adhesion is that both headlight and InvisiGARD® Headlight Protectors are at or slightly above room temperature (60-90 degrees F). USE CAUTION NOT TO OVERHEAT SURFACE OR HEADLIGHT PROTECTOR MATERIAL. |
|
|
|
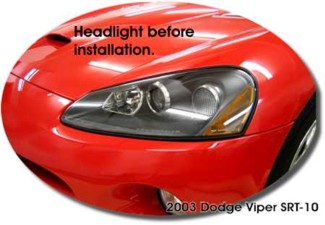
This is what the vehicle looked like before the system was installed....., |
|
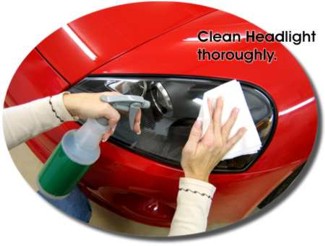
First, using a clean, lint-free wipe (i.e. untreated paper towel), clean ENTIRE surface of the headlight with an adhesive remover to remove waxes, silicones, etc., from surface. Second, clean headlight surface again with glass cleaner (avoid cleaners containing ammonia and/or soaps). Cleaning with DENATURED ALCOHOL will suffice for both previous steps (NOTE: DO NOT USE ISOPROPYL/RUBBING ALCOHOL). Rubbing surface with fingers should yield a "squeaky clean" feeling & sound. Clean well around the aiming guides and the extreme edges of headlamp surface. Note: While denatured alcohol is recommended for use in this surface cleaning step, take care not to allow full-strength denatured alcohol to touch the InvisiGARD® product. The aggressive nature of this chemical may haze or melt the glossy surface. |
|
|
A note about Headlight Cleanliness |
|
|
The prior use of synthetic protectants and silicones (i.e. Armorall, Son of a Gun, Rainex, etc.) on the substrate can result in adhesive difficulties. Therefore, special substrate cleaning with a silicone removal agent (i.e. 3M #08984 General Purpose Adhesive Cleaner, Denatured Alcohol, etc.) may be required, perhaps repeatedly. A final cleaning with DENATURED ALCOHOL is recommended with thorough drying of surface. Clean surface until all slick feel on the substrate is gone. Always test any cleaner on inconspicuous area first for any reactions to surface finishes. |
|
|
|
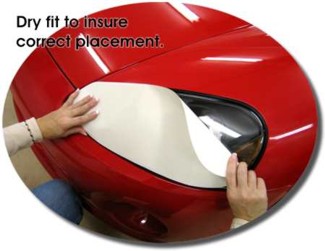
Pre-fitting is suggested. As shown above, you'll be receiving the Protector set on a sheet. Carefully trim backing sheet around the Protectors with a scissors or utility knife (be careful not to cut into the Protector). Once trimmed, "dry fit" the covers to get an idea of how they are to be installed. Due to the nature of the InvisiGARD® product, the Protectors may appear smaller or shorter than the actual headlight, however you'll be stretching them into place in the installation process. |
|
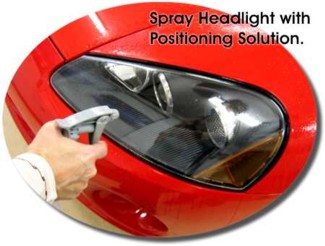
Mix a spray bottle full of Positioning Solution using just a few drops of baby shampoo in a bottle full of warm water. Positioning Solution will help you "slide" the Protector into place on the larger headlights such as the one shown. Smaller lights may not require this solution and can simply be applied with Mounting Solution as described below. Once solution is mixed, spray headlight well. |
 |
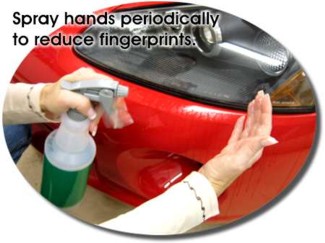 |
Installation Tip: To reduce the possibility of unwanted fingerprints in the adhesive system of the Protectors, keep hands wet with Positioning or Mounting solution. |
|
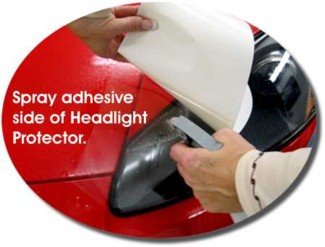
After you spray the headlight, peel the Protector from the backing paper and spray the adhesive side of the Protector. |
 |
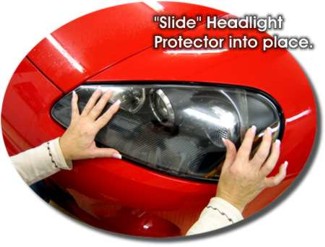 |
Once both contact surfaces are sprayed with solution, "slide" protector into place. Remember that Protector may be smaller or shorter than the actual headlight. In this case, "slide" the Protector into the best possible fit, keeping in mind that you'll be stretching the Protector into place in the final step. |
|
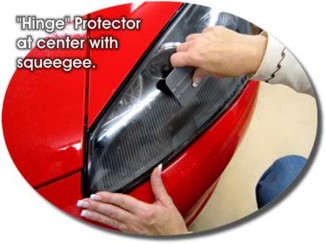
When you feel the protector is in place, set a "hinge" point by squeegeeing the Protector at the center. When using a squeegee, keep in mind that you are making an effort to force air and solution out from between the two contact surfaces. Spraying a little solution on the outside of the Protector will allow the squeegee to slide over the surface of the Protector easier. |
 |
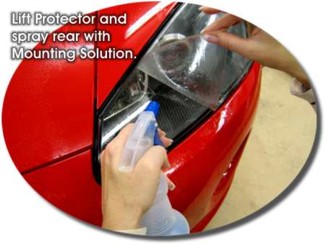 |
Once the "hinge" point is set, lift one side of the Protector and spray both the headlight and the adhesive side of the Protector thoroughly with Mounting Solution. Mounting solution consists of a 50/50 mixture of warm water and denatured alcohol. |
|
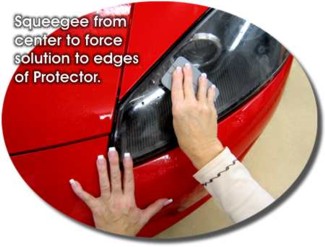
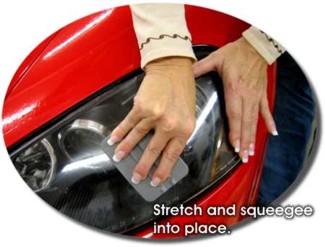
Carefully lay Protector into place and proceed to squeegee the Protector from the center "hinge" point. Remember, spraying a little solution on the outside of the Protector will allow the squeegee to slide over the surface easier. |
 |
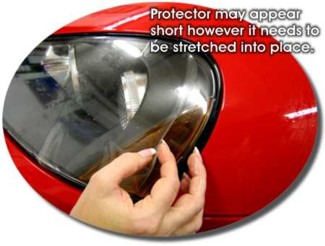 |
As you can see in the image, this particular Protector is approximately .75" (19.05mm) shorter than the actual headlight. The InvisiGARD® Protector material consists of a urethane film that is very stretchable. Taking advantage of this property, most irregularly shaped headlights such as the one shown will require stretching into proper placement. |
|
Lift the rest of the Protector and spray both headlight and Protector surfaces thoroughly with Mounting Solution. Carefully reset Protector and s-t-r-e-t-c-h it into place while at the same time working the air and solution out with a squeegee. Please Note: Installed crooked? Don't despair. Protector can be lifted and reset1 - even if you squeegeed it down. Just remember to apply more Mounting Solution prior to resetting with a squeegee. |
 |
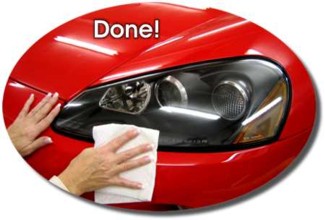 |
,....and here is a photo of what the vehicle looks like after the installation. Virtually Invisible! |
|
Simple As That! |
|
| 1 WARNING *** INSTALLATION NOTE *** WARNING | |
|
Most headlamp lenses and
assemblies are manufactured from plastic materials. After the lense is
molded to it’s current shape, a protective clear is sprayed onto the
surface and subsequently baked to harden. The following link to a YouTube video show the complete process of Headlamp manufacturing: https://youtu.be/KoBfqvSZN7c As the vehicle and headlamp lense ages, factors such as atmospheric conditions (sun, rain, cold) as well as outside occurrences (road debris [sand, rocks, etc.]) deteriorate the clearcoat initially sprayed onto the plastic during the manufacturing process. Thus, in most cases, this leaves the plastic lense exposed which allows the material to haze as well as release more and more of the protective clearcoat. Extra care is required for vehicles older than one (1) year so as to not peel the existing clearcoat. Liberal use of application fluid as well as limited re-positioning, if any, will assist in a successful installation. Rest assured that once the InvisiGARD protector is successfully applied, further deterioration of the clearcoat and lense is remarkably suppressed. |
|
| ALLOW ADHESIVE TO SET OR CURE FOR AT LEAST 72 HOURS BEFORE WASHING THE SURFACES. As a rule, any visible grainy images in the film (after thoroughly rubbing out the film) will cure out within that 72 hour period. MANUFACTURER AND/OR DISTRIBUTOR CANNOT BE HELD RESPONSIBLE FOR IMPROPER INSTALLATION. | |
| IMPORTANT: ROUTINE CLEANING OF InvisiGARD® WITH A PLASTIC CLEANER/POLISH, SUCH AS RAPID CLEAR, WILL HELP PREVENT ROAD CONTAMINANTS AND ENVIRONMENTAL FALLOUT FROM ACCUMULATING AND DULLING THE FILM SURFACE. ***DO NOT WAX InvisiGARD® FILM*** THE ONLY PRODUCT WE ENCOURAGE OUR CUSTOMERS TO USE ON InvisiGARD® PRODUCTS IS RejeX® High Gloss Polish. PLEASE SEE OUR TECHNICAL BULLETIN FOR FURTHER INFORMATION. | |
|
IMPORTANT NOTICE TO PURCHASER. |
|
| The manufacturer and seller of this product believe this product to be suitable and to have the necessary characteristics to serve it’s intended purpose based upon the technical information, testing and statements herein, which we believe to be reliable, however, the completeness and accuracy thereof is not guaranteed. Manufacturer and seller make no warranties, expressed or implied, including implied warranties of merchantability for this product and fitness for any purpose. Manufacturer's and seller’s sole obligation shall be the replacement of that portion of this product proven to be defective. Before using this product, user shall examine and determine the suitability of this product for user's intended purpose and assumes all risk and liability whatsoever related to its use. Neither Manufacturer NOR SELLER SHALL BE LIABLE, EITHER IN CONTRACT OR TORT for THE USE Of, MISUSE, OR INABILITY TO USE THIS PRODUCT. THIS SHALL COVER ANY LOSS OR DAMAGE, DIRECT, INDIRECT, INCIDENTAL OR CONSEQUENTIAL RELATED TO THE USE Of THIS PRODUCT. No recommendation or statement outside of this notice shall have any effect or force except in writing signed by authorized officers or manufacturer and seller. | |
|
|
|
| As always, if you have any questions feel free to e-mail us. We're here to serve. Thanks! |
| Need to contact us? Simply email us at customerservice@autotrimdesign.com. |
|
Copyright © 2017 [Auto Trim DESIGN®]. All rights reserved. InvisiGARD® is a registered trademark of Auto Trim DESIGN® of Northeast Wisconsin, Inc. |