|
The InvisiGARD Paint and Headlight Protection product is a simple way to provide ultimate protection for your bike's painted and headlamp surfaces. With the comprehensive written instructions as well as detailed photos and informative videos, you'll see that just about anyone can install this product with ease. |
|
| >>> Instructional Video <<< | |
|
The set of instructions shown below reference installation information on various areas of Harley-Davidson bikes. The first part explains general installation information, as illustrated on a V-Rod, while the balance demonstrates specific tips and techniques on the Ultra Classic Electric Glide. As one of the largest and most difficult kits to install, the principles offered on the latter will assist in the installation of our product on just about any bike. |
|
| Written Instructions | |
|
|
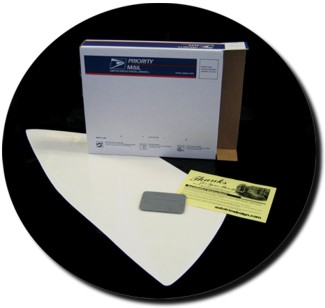
The kit ordered will include a squeegee, a sheet of InvisiGARD precut pieces and information on how to view our detailed and comprehensive online instructions. |
|
Installation supplies you'll need to gather include two (2) spray bottles, paper towels, denatured alcohol (or methyl hydrate), baby shampoo, scissors (or utility knife) and squeegee. We provide the squeegee with the kit. The reason we suggest baby shampoo is that it contains less detergents than other liquid soap products.
|
 |
|
|
***New*** As an alternative to denatured alcohol (or methyl hydrate) & baby shampoo, try Rapid Tac! Available in various sizes, this environmentally friendly product can be used as a cleaner, Positioning Solution and Mounting Solution - All in One! Best of all Rapid Tac stimulates the adhesive to bond in approximately ninety seconds, even in adverse climates such as extreme hot or cold. It will not cause bubbles so there's no returning to poke holes in your work either. It's what we now use for our local installations!
|
|
A note about Installation Conditions |
|
|
HEADLIGHTS, PAINTED SURFACES AND InvisiGARD PAINT AND HEADLIGHT PROTECTION PRODUCT MUST BE AT OR SLIGHTLY ABOVE ROOM TEMPERATURE FOR INSTALLATION. The key to maximum adhesion is that installation surfaces and InvisiGARD product are at or slightly above room temperature (60-90 degrees F). USE CAUTION NOT TO OVERHEAT SURFACE OR InvisiGARD MATERIAL. |
|
|
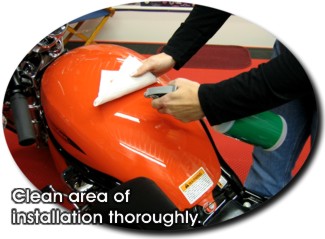
First, using a clean, lint-free wipe (i.e. untreated paper towel), thoroughly clean all areas of installation with an adhesive remover to remove waxes, silicones, etc. Second, clean surfaces again with glass cleaner (avoid cleaners containing ammonia and/or soaps). Cleaning with DENATURED ALCOHOL will suffice for both previous steps (NOTE: DO NOT USE ISOPROPYL/RUBBING ALCOHOL). Rubbing surface with fingers should yield a "squeaky clean" feeling & sound. Note: While denatured alcohol is recommended for use in this surface cleaning step, take care not to allow full-strength denatured alcohol to touch the InvisiGARD product. The aggressive nature of this chemical may haze or melt the glossy surface. |
|
|
A note about Surface Cleanliness |
|
|
The prior use of synthetic protectants and silicones (i.e. Armorall, Son of a Gun, Rainex, etc.) on the substrate can result in adhesive difficulties. Therefore, special substrate cleaning with a silicone removal agent (i.e. 3M #08984 General Purpose Adhesive Cleaner, Denatured Alcohol, etc.) may be required, perhaps repeatedly. Final cleaning with DENATURED ALCOHOL is recommended with thorough drying of the surface. Clean all surfaces until all slick feel on the substrate is gone. Always test any cleaner on inconspicuous area first for any reactions to surface finishes. |
|
|
|
Pre-fitting is suggested. As shown above, you'll be receiving the InvisiGARD product on a sheet. Carefully trim backing sheet around each individual piece with a scissors or utility knife (be careful not to cut into the InvisiGARD). Once trimmed, "dry fit" each piece to get an idea of how they are to be installed. Due to the nature of the InvisiGARD product, some of the pieces may appear smaller or shorter than the actual area of installation, however you'll be stretching them into place in the installation process. |
|
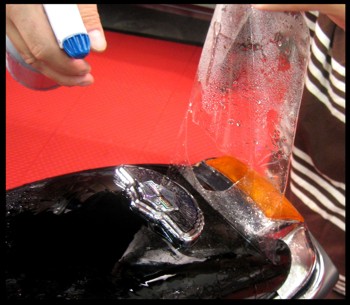
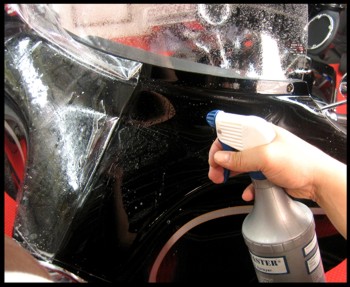
Mix a spray bottle full of Positioning Solution using just a few drops of baby shampoo in a bottle full of warm water. Positioning Solution will help you "slide" the InvisiGARD into place on the larger pieces such as the one shown. Smaller pieces may not require this solution and can simply be applied with Mounting Solution as described below. Once solution is mixed, spray area of installation liberally. |
 |
 |
Installation Tip: To reduce the possibility of unwanted fingerprints in the adhesive system of the InvisiGARD, keep hands wet with Positioning or Mounting solution. |
|
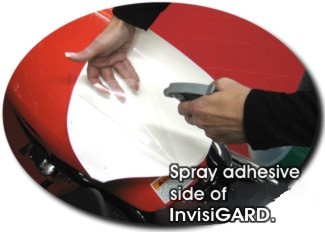
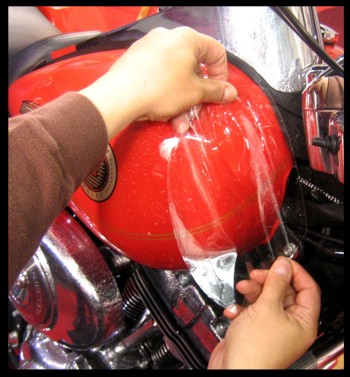
After you spray the area, peel the InvisiGARD from the backing paper and spray the adhesive side with the solution. |
 |
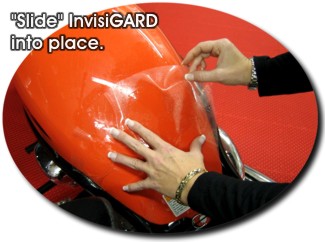 |
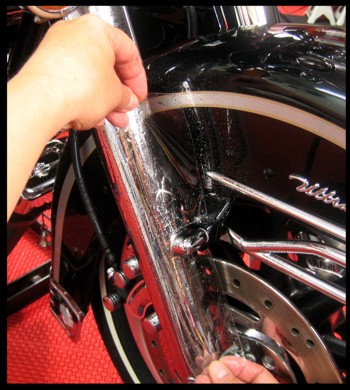
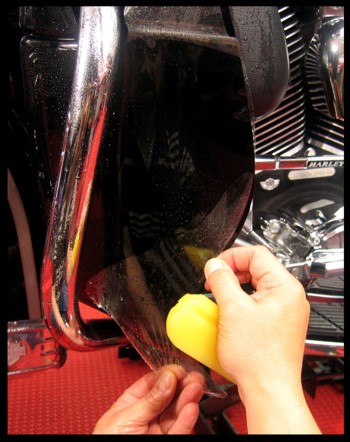
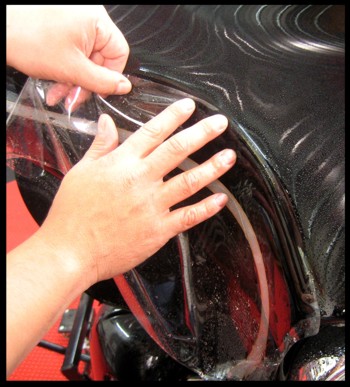
Once both contact surfaces are sprayed with solution, "slide" the piece of InvisiGARD into place. Remember that the piece may be smaller or shorter than the actual area. In this case, "slide" the piece into the best possible fit, keeping in mind that you'll be stretching the InvisiGARD into place in the final step. |
|
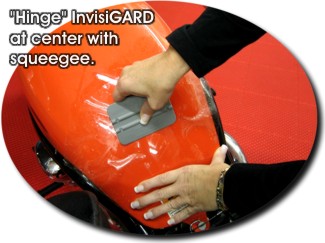
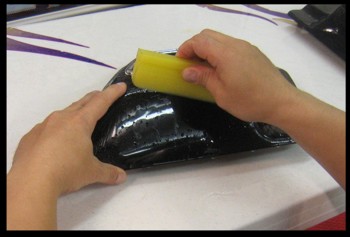
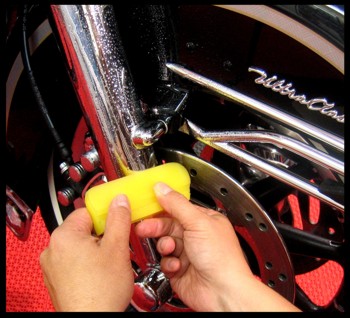
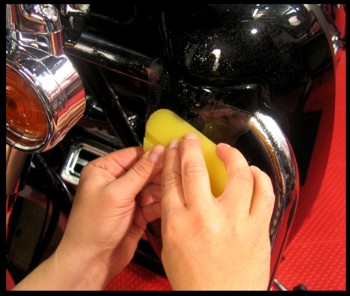
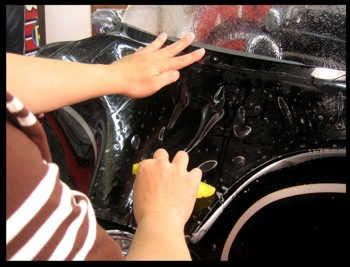
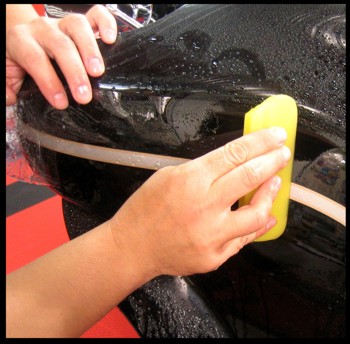
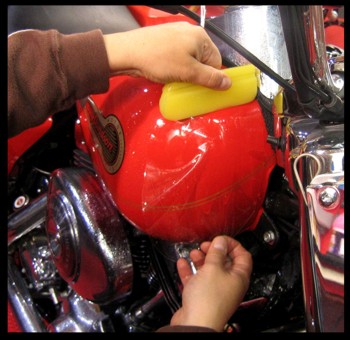
When you feel the InvisiGARD is in place, set a "hinge" point by squeegeeing the piece at the center. When using a squeegee, keep in mind that you are making an effort to force air and solution out from between the two contact surfaces. Spraying a little solution on the outside of the InvisiGARD will allow the squeegee to slide over the surface easier. |
 |
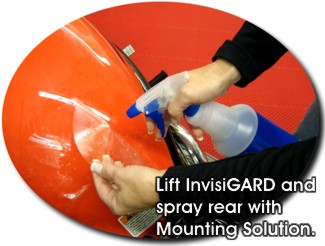 |
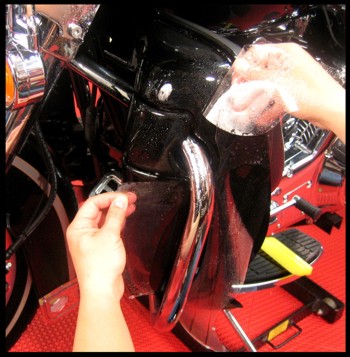
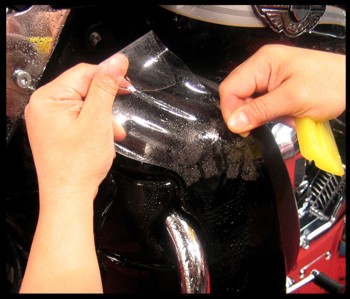
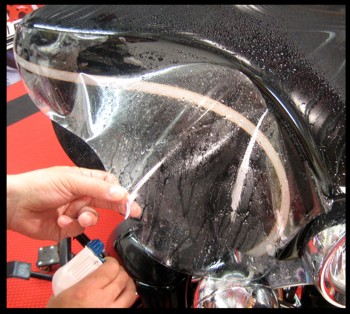
Once the "hinge" point is set, lift one side of the InvisiGARD and spray both the area and the adhesive side of the InvisiGARD thoroughly with Mounting Solution. Mounting solution consists of a 50/50 mixture of warm water and denatured alcohol. |
|
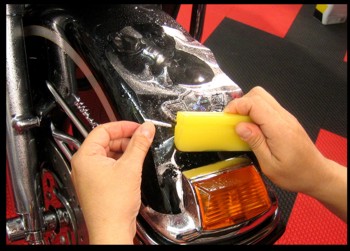
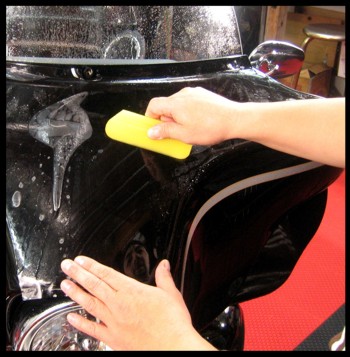
Carefully lay the InvisiGARD into place and proceed to squeegee the piece from the center "hinge" point. Remember, spraying a little solution on the outside of the InvisiGARD will allow the squeegee to slide over the surface easier. |
 |
 |
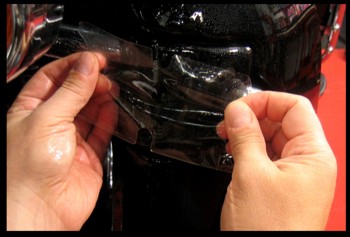
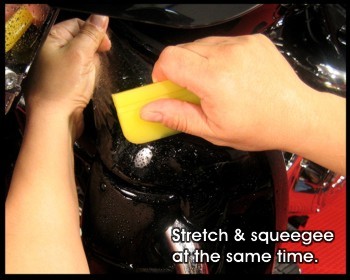
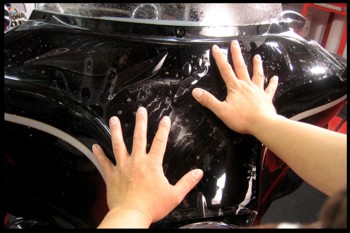
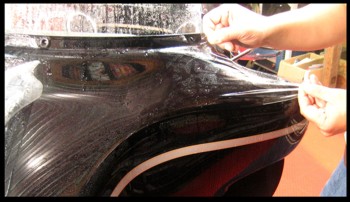
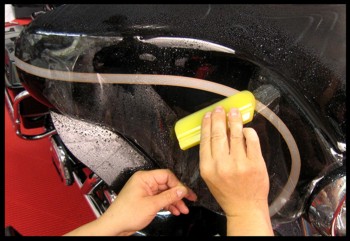
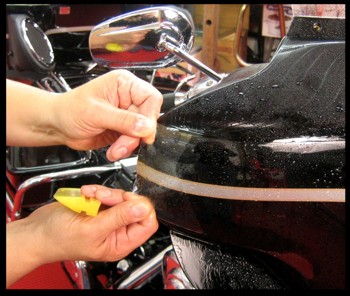
As you may/may not see in the image, this particular piece is approximately .5" (12.7mm) narrower than the actual area of installation. The InvisiGARD material consists of a urethane film that is very stretchable. Taking advantage of this property, most irregularly shaped and curved surfaces such as the one shown will require stretching into proper placement. |
|
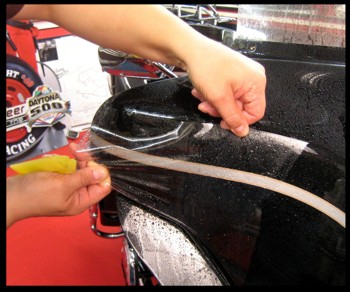
Lift the rest of the InvisiGARD piece and spray both painted and InvisiGARD adhesive surfaces thoroughly with Mounting Solution. Carefully reset InvisiGARD and s-t-r-e-t-c-h it into place while at the same time working the air and solution out with a squeegee. Please Note: Installed crooked? Don't despair. InvisiGARD can be lifted and reset - even if you squeegeed it down. Just remember to apply more Mounting Solution prior to resetting with a squeegee. |
 |
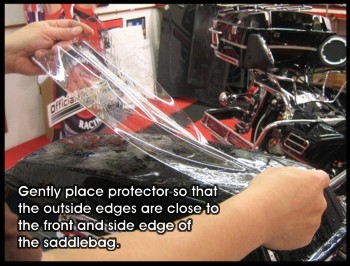 |
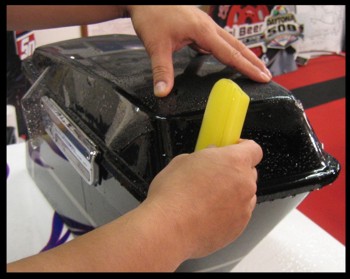
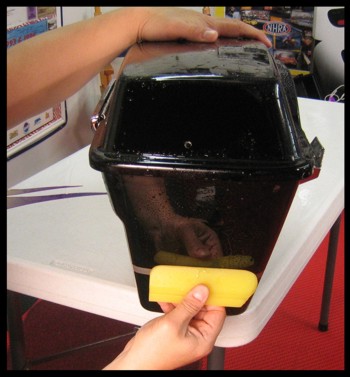
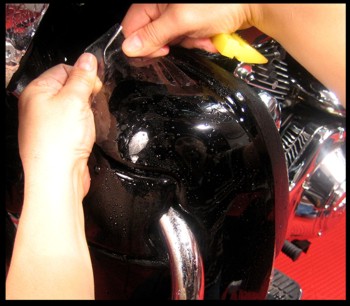
Installation on parts of the bike such as Saddlebags and Sidecovers are sometimes easier if removed. Starting with the top of the Saddlebag, gently place the protector on the top and position it so that it is close to the front and side outer edges. This will allow the side protector, when installed, to be spaced approximately .125" from the top protector. |
|
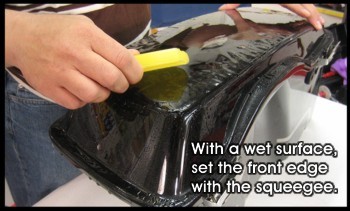
Once in place, "set" the front edge of the protector with a wet squeegee so that approximately 1-2" is adhered to the surface. |
 |
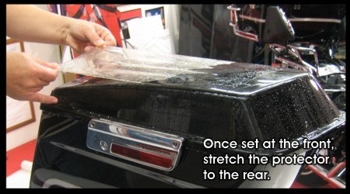 |
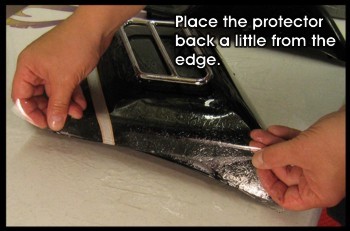
Setting the front as noted above will allow the piece to be stretched back into place. Keep the protector close to the outside edge while stretching. |
|
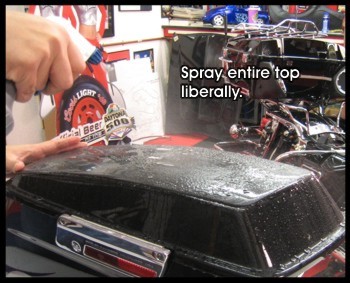
While holding onto the rear of the stretched piece, spray the protector liberally with solution. This will allow your squeegee to glide while setting the piece in place. |
 |
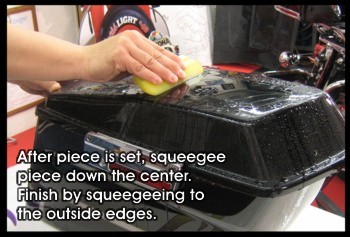 |
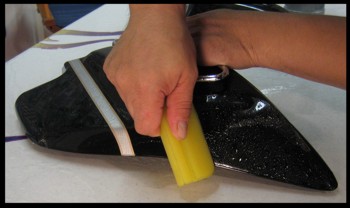
Firmly squeegee right down the center. Then squeegee out to the sides. |
|
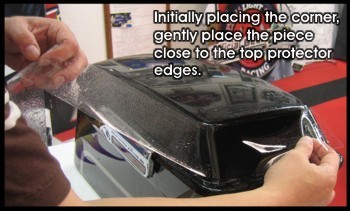
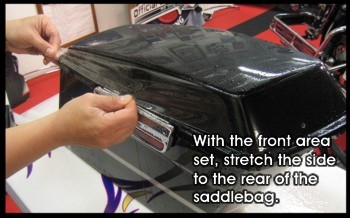
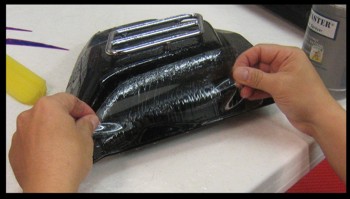
Once the top protector is set, it is easy to place the side piece. Starting with the corner, place the piece around the front and down the side - allowing a space between the pieces of approximately .125". |
 |
 |
Once placed, set the front. |
|
After the front is set, stretch the side into place so that the end of the protector matches the end of the Saddlebag, taking care to maintain consistent spacing along the top edge. |
 |
 |
Holding the rear of the piece in place, squeegee from front to back with firm, even pressure. |
|
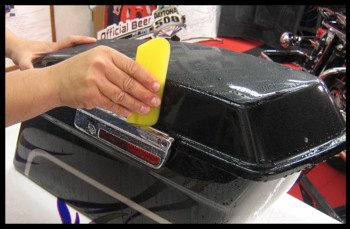
Starting with the top of the Saddlebag front protector, set the piece so that it can be worked down to the bottom. |
 |
 |
After the piece is set at the top, simply squeegee down the center, working out to the sides thereafter. Remember to keep the top surfaces of the protector wet so that the squeegee glides over the top. |
|
The right Sidecover protector is fairly easy to install. Place the piece approximately .0625" from the cover edge as shown. |
 |
 |
Once placed into position, set with your squeegee by working each way from the center. |
|
Use the same principles for the Sidecover top protectors as noted above. |
 |
 |
Ditto. |
|
The right Sidecover however proves a little more difficult, due to the concave exhaust pipe area. |
 |
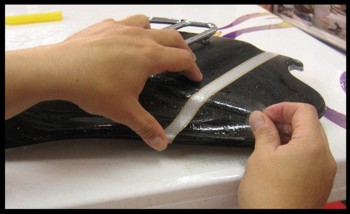 |
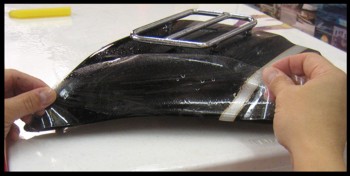
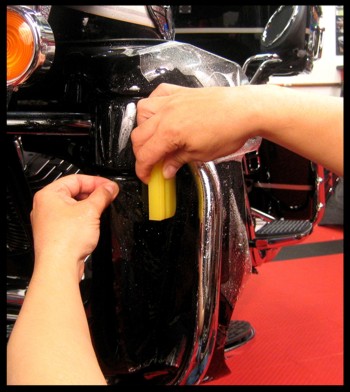
Go ahead and place the piece approximately .0625" from the edge as the previous piece. However, using your thumb in lieu of a squeegee, set the bottom edge as shown. |
|
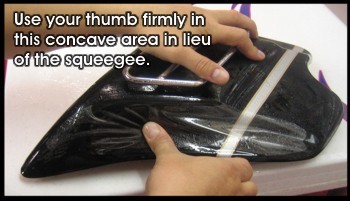
Once set on the bottom edge, use your thumb into the concave area as shown. You can then finish around the edges with a squeegee. |
 |
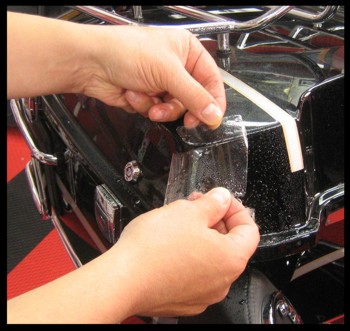 |
This little piece will do wonders in keeping your Tour-Pak's front top corners from damage caused by backrest chaffing. Simply place the piece so that it covers the top, front and side as shown. Each corner piece is slightly different so as to accommodate the Tour-Pak's dissimilar rivet patterns. |
|
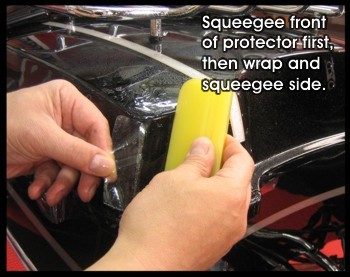
Once the front is set, simply wrap the side as shown and then finish by setting the top. |
 |
 |
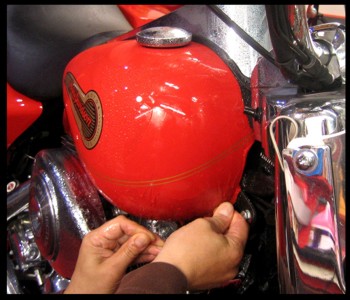
Tank pieces are a little more difficult than other pieces due to the compound curves at the rear of the tank. We have created a relief cut in these pieces to wrap the back corner accordingly. Simply start by placing the piece along the center trim as shown. |
|
Once placed, set the edge close to the center trim with a squeegee. |
 |
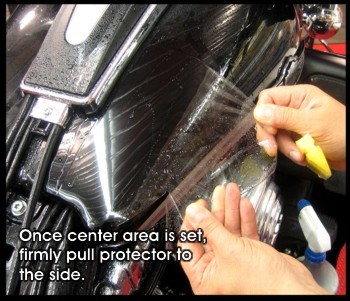 |
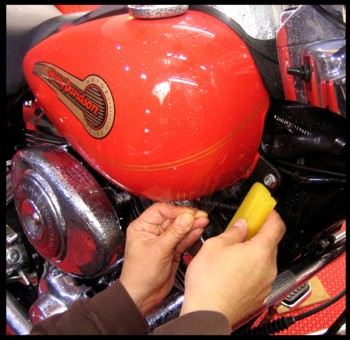
When the center area is set, firmly pull the protector to the side and down. |
|
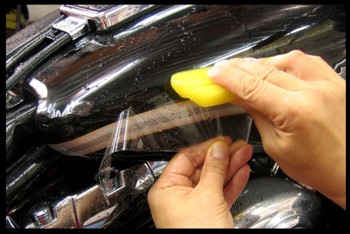
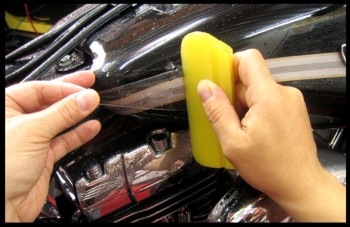
Squeegee the rest of the protector, leaving the rear relief flap for last. |
 |
 |
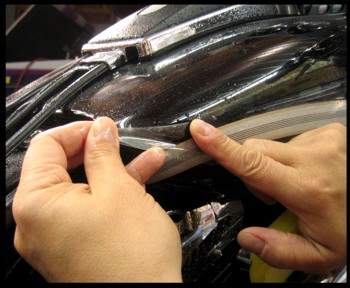
After the side is squeegeed, simply pull the relief flap back...., |
|
line up the edges so that they are approximately .0625" away from each other and then set it into place with a squeegee. Installation Note: When placing pieces next to each other we recommend a space of at least .0625". Overlapping pieces does not look good. Furthermore, the small space suggested allows for easy removal of dried polish when/if the bike is detailed. |
 |
 |
Fork protectors work great in protecting the factory aluminum forks from finish deterioration - especially in the coastal areas. Start the installation by placing the piece along the outside edge.
|
|
Once positioned, simply squeegee from the center down and then up. |
 |
 |
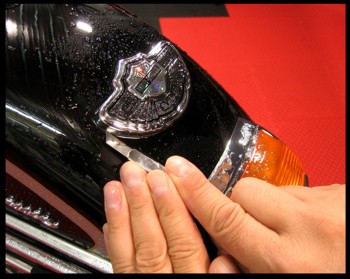
Fender pieces are generally easy to install, with the exception of front fenders with decorative trim such as the 100th Anniversary badge as shown. To begin this type of installation, place the protector so that it can be set at the front edges, along the front trim as shown. |
|
Once placed, set the front edge with a squeegee. |
 |
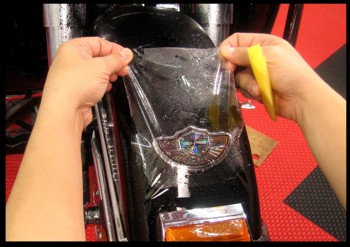 |
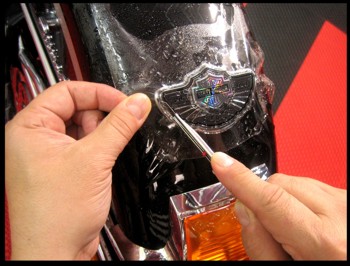
With the front set, pull the protector back onto the badge/ornament as shown (you may have to pierce the protector for larger badge/ornament objects). |
|
With the rear temporarily set, carefully rough cut the badging/ornament so that the hole is slightly smaller than the badge/ornament. |
 |
 |
When successfully rough cut, pick up the rear of the piece and re-wet the installation area. |
|
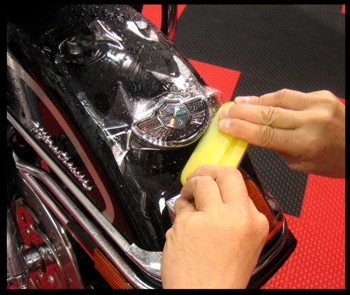
Set the piece back down and work the protector around the badge/ornament. |
 |
 |
When the rest of the piece is in place, carefully trim excess material around the badge/ornament so that the protector material lays flat onto the painted fender surface. |
|
When installing the lower fairing pieces, start with the smallest pieces first. |
 |
 |
Set the center of the cover piece..., |
|
then pull and squeegee each side of the cover into place. |
 |
 |
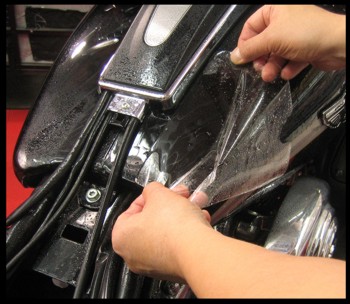
Then place the side piece around the chrome bar as shown. Remember to keep your hands wet with solution to prevent unwanted fingerprints. |
|
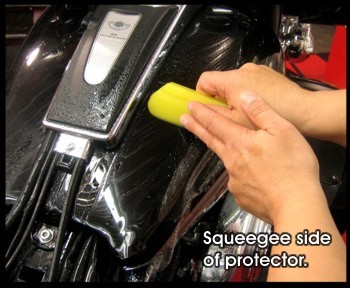
With the lower portion of the side protector in place, set the area shown here with a squeegee. |
 |
 |
Once the area above is set, this will allow the piece to be stretched into place along the lower edges. Squeegee the lower areas into place as you stretch, always keeping the underside and the top of the protector wet with solution. |
|
After successfully setting the lower portion of the side, pull and stretch the upper area into place around the bulbous top. |
 |
 |
We have shrunk the piece in this area so that it can be stretched rather aggressively into place. Squeegee as you stretch. |
|
Keep stretching and squeegeeing into the end of the piece. |
 |
 |
Once the side protector is set, place the inner protector approximately .0625" from the side protector |
|
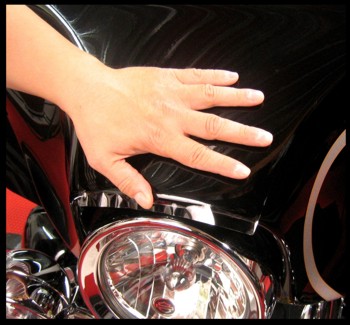
Ok, here we go. Probably the most difficult part of the installation. As you can see, we left the largest and most difficult part close to the end. This allows for the installer to work with the material, learn the stretching capabilities of the film and gain confidence for areas such as the following. After liberally wetting the entire top center of the upper fairing, position the wetted center piece in place. Use the center windshield screw and the headlight as centering reference. |
 |
 |
Once positioned, carefully set the center from top to bottom with a set width of about 1-2". This will allow the sides to be picked up for stretching and setting. |
|
After the center is set, pickup one of the sides and liberally spray the protector bottom and fairing top with solution. Keep in mind that there is no such thing as too much solution. In fact, the more the better. |
 |
 |
With a wetted top surface, squeegee from the center to the sides. |
|
With about 60% of the side set, re-wet and stretch the end of the top piece into place. Squeegee thereafter. The top protector has been shrunk so that it can be stretched into place approximately .0625" shy of the rear edges. Once one side is complete, repeat these steps on the other side of the top protector. |
 |
 |
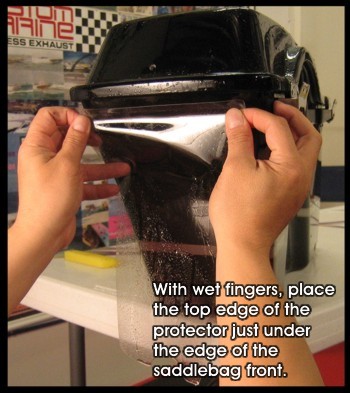
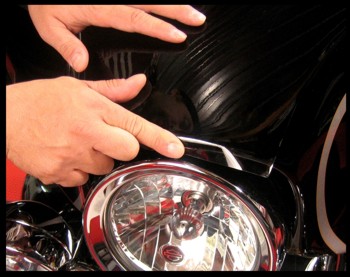
Slightly roll the front edge of the protector over the fairing edge with your thumb as shown. Leave the rest (approximately .375") to roll over when the film is dry. |
|
When the film and fairing surfaces appear to be dry, carefully and firmly roll the rest of the film into the headlight well. Wetting your finger will help it glide along the protector surface, thereby decreasing the chances of air bubbles. Do not use a heat gun to hurry this process. You will realize better results from allowing the film and painted surfaces to air dry. |
 |
 |
Once the top center is successfully set, place the side protectors, starting with the front as shown. Allowing approximately .25" to hangover, begin placing the piece about .0625" from the edge of the top protector. |
|
Progressively place the top edge as shown along the edge of the top protector. |
 |
 |
Once the piece is placed and the top edge is set with a squeegee, pickup the side protector as shown and liberally spray the underside with solution. Installation Note: These pieces are easier to install with the fog lights dropped and out of the way. Two (2) screws to remove and a towel to protect the top of the Front Fender. Easy. |
|
With a wet protector surface, proceed by setting the center area as shown. You may find that using the palm of you hand may work better in the concave area of the side than a squeegee. |
 |
 |
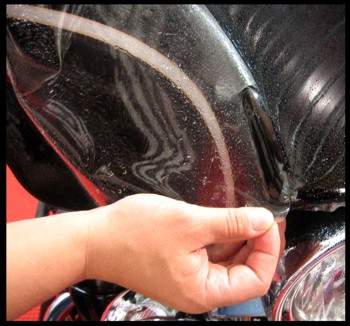
Once the large center area is set, work forward with the squeegee. Roll the front edge by the headlight much the same way as shown on the top protector. |
|
With the center and front set, carefully pickup the rear of the protector and stretch and set in increments. |
 |
 |
First the mid portion...., |
|
then, the end. Take care to keep consistent .0625" spacing between the top and side protectors. Repeat these steps on the other side. |
 |
 |
For kits that include tank front protectors, follow these directions for proper placement and installation. When creating tank front protectors, we shrink and shape the pieces to allow for the bulbous shape. In all cases, we design the pieces to begin the installation at the top. |
|
Thus, place the top edge as shown. Also, place the inner side so that it is away from the inner tank edge. This will allow you to stretch the piece down and in so as to reduce "fingers" or "puckers" that may appear on the outside edge of the protector. |
 |
 |
Stretch the protector down and in as shown here..., |
|
then squeegee the protector as you stretch. Depending on whether "fingers" pop up on the edges, you may wish to pull this piece up and reset as desired. Alternatively, the edges can be carefully trimmed, once the piece is dry, thereby eliminating any fingers/puckers that may appear while drying. |
 |
|
Simple As That! |
|
| ALLOW ADHESIVE TO SET OR CURE FOR AT LEAST 72 HOURS BEFORE WASHING THE SURFACES. As a rule, any visible grainy images in the film (after thoroughly rubbing out the film) will cure out within that 72 hour period. MANUFACTURER AND/OR DISTRIBUTOR CANNOT BE HELD RESPONSIBLE FOR IMPROPER INSTALLATION. | |
| IMPORTANT: ROUTINE CLEANING OF InvisiGARD WITH A PLASTIC CLEANER/POLISH, SUCH AS RAPID CLEAR, WILL HELP PREVENT ROAD CONTAMINANTS AND ENVIRONMENTAL FALLOUT FROM ACCUMULATING AND DULLING THE FILM SURFACE. ***DO NOT WAX InvisiGARD FILM*** THE ONLY PRODUCT WE ENCOURAGE OUR CUSTOMERS TO USE ON INVISIGARD PRODUCTS IS ROD & CUSTOM SHOW GLOSS CREME. PLEASE SEE OUR TECHNICAL BULLETIN FOR FURTHER INFORMATION. | |
|
IMPORTANT NOTICE TO PURCHASER. |
|
| The manufacturer and seller of this product believe this product to be suitable and to have the necessary characteristics to serve it’s intended purpose based upon the technical information, testing and statements herein, which we believe to be reliable, however, the completeness and accuracy thereof is not guaranteed. Manufacturer and seller make no warranties, expressed or implied, including implied warranties of merchantability for this product and fitness for any purpose. Manufacturer's and seller’s sole obligation shall be the replacement of that portion of this product proven to be defective. Before using this product, user shall examine and determine the suitability of this product for user's intended purpose and assumes all risk and liability whatsoever related to its use. Neither Manufacturer NOR SELLER SHALL BE LIABLE, EITHER IN CONTRACT OR TORT for THE USE Of, MISUSE, OR INABILITY TO USE THIS PRODUCT. THIS SHALL COVER ANY LOSS OR DAMAGE, DIRECT, INDIRECT, INCIDENTAL OR CONSEQUENTIAL RELATED TO THE USE Of THIS PRODUCT. No recommendation or statement outside of this notice shall have any effect or force except in writing signed by authorized officers or manufacturer and seller. | |
|
|
|
| As always, if you have any questions feel free to e-mail us. We're here to serve. Thanks! | |
| Need to contact us? Simply email us at customerservice@autotrimdesign.com. | |
|
Copyright © 2009 [Auto Trim DESIGN]. All rights reserved. InvisiGARD is a registered trademark of Auto Trim DESIGN of Northeast Wisconsin, Inc. |
|