|
 |
| 1) Please review the
general
Custom Graphics Installation Instructions to become familiar
with the preparation of the finished surfaces and methods of
installation. |
| 2) Cut the graphics apart
from the kit sheet. Carefully cut each piece so that approximately
1/8" (.64cm) of the excess backing and application paper is exposed. |
| 3) The stripe kit is set
for a 1" (25.40mm) space between the center hood stripe and the two (2)
outer hood stripes. Thus, mark with a
grease pencil, fine line tape or other temporary marking device
where the stripes are to be placed. You will use these marks to
place your stripes. |
|
Prior to installing the center Hood stripe, carefully
remove the Washer Nozzles for easier installation. |
|
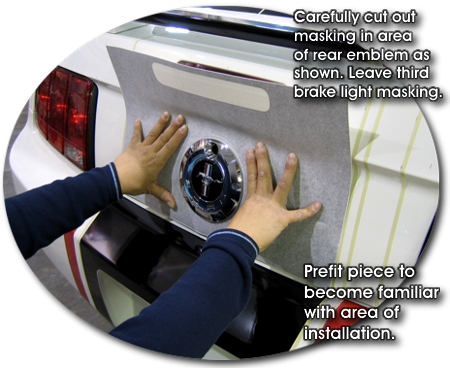
If your Mustang is equipped with a spoiler, removal
of the spoiler is required for the installation of Rear Lid piece "l". |
|
|
4) Most of the stripes, with the exception of
pieces "a" & "n", are pretty
straight-forward as far as installation goes. All the stripes have an
approximate .0625"-.125" (1.5875mm-3.175mm) margin at each end. So, simply center the
stripes in the area and install. We usually install from the center of
the stripe and work to each end with the squeegee. This is done by
simply peeling approximately 2-4" (5.08cm-10.16cm) of the backing paper from the center,
folding each side of the backing paper slightly, and "hinging" the
graphic from the center. |
|
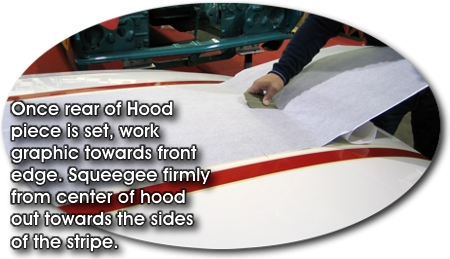
5) Once center hood stripe is set (1.0625"
[26.9875mm] from rear edge of hood), the rest of the graphic pieces
should fall into place. Top edges of pieces f thru i should be set
at bottom body line found at fenders and door. |
|
|
|
|
Center Stripe piece "a" - Hood |
| Please Note:
While the following instructions are for our
Ford Mustang Two Color
Rally Stripe Graphic Kit 1 (ATD-FRDMSTNGGRPH12a/b),
much of the same principals of installation apply.
Rear edge of center hood stripe should be set
1.0625" (26.9875mm) from rear edge of hood. This will help set the
distance of the adjacent stripes from the back edge of the hood.
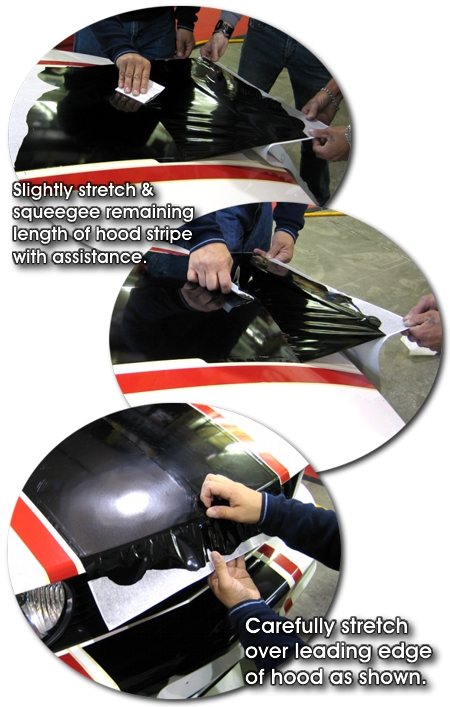
Due to the contour of the Hood's front area,
piece "a" will require slight "stretching" at the beginning 16"-20"
(406-508mm). You will need the assistance of another person at this
stage of the installation. |
 |
| Firm pressure of the squeegee
will help keep the air bubbles and creases out. |
 |
| When you get to within 16"-20"
(406-508mm) of the front edge of the hood, you'll notice difficulty
in continuing without creases. The vinyl will need to be stretched
into place from this point forward. |
 |
| With the help of another
individual, carefully squeegee the remaining portion of stripe while
slightly stretching it forward. Covering your squeegee with a soft
cotton cloth will help keep the small scratches down. If small
scratches occur, these can be removed with polishes/waxes made
specifically for swirl and/or scratch removal.
Take care not to stretch the vinyl film too much.
Some colors may actually discolor in areas of over-stretching. |
 |
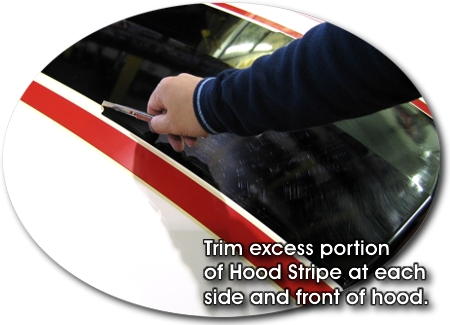
| You'll notice that about 1/3 of
the stripe is wider at the front of the hood area. The stripe is
manufactured this way so that it can be trimmed to fit once the
front is stretched into place. Moreover, after the film is stretched
over the front edge, you can trim the end to match the adjacent
stripe lengths. |
 |
|
|
Trimming stripes on painted surfaces requires a light
touch. If you see motor oil seeping out through the paint, you know
you've cut too deep. A good rule of thumb for trimming our 2 mil vinyl
material is to let the weight of the knife drag over the vinyl. Rather
than putting pressure on the knife, which can result in cutting into the
paint, a new sharp blade and the weight of the knife will generally be
enough to pierce the film, which usually is enough to remove the excess
vinyl. |
|
When installation of the Hood stripes is complete, simply cut an "X"
in the Washer Nozzle holes located in the hood and re-install the
Nozzles through the vinyl. |
|
In the event a new piece is required, don't fret.
While it's frustrating that a little piece of vinyl can give us so much
grief, just remember that the worst case scenario is the you just have
to purchase another one - it's certainly not the end of the world. We
suggest swearing a bit and moving on. |
|
|